Ubuntu Countdown

Tuesday, December 25, 2007

How to: Install IE4Linux on Ubuntu 7.10 (Gutsy Gibbon)

Hi guy!, I just post this matter after I have asking from my friend, how to install "Internet Explorer " on Linux. Sometime, web base application didn't matching the code with others browser. Thats why my friend ask me to do that. I suggest him to use IE4Linux. This is the way I install the IE4Linux on Ubuntu 7.10(Gutsy Gibbon)

1. Make sure you login your Ubuntu Linux with normal user. Don't login as root. Sometime IE4Linux won't come out or launching when you login as root after install.

2. Open your terminal

3. Open /etc/apt/sources.list with command. For this case I use gedit. Please use your favorite editor for easy editing. For example Vi editor, Nano editor etc.
sudo gedit /etc/apt/sources.list
4. Uncomment (or add) following lines:
deb http://us.archive.ubuntu.com/ubuntu gutsy universe

5. Add this line:

deb http://wine.budgetdedicated.com/apt gutsy main

6. Close gedit. Update and install wine and cabextract:

wget -q http://wine.budgetdedicated.com/apt/387EE263.gpg -O- | sudo apt-key add -
sudo apt-get update
sudo apt-get install wine cabextract
7. Download IEs 4 Linux and install
wget http://www.tatanka.com.br/ies4linux/downloads/ies4linux-latest.tar.gz
tar zxvf ies4linux-latest.tar.gz
cd ies4linux-*
./ies4linux

Friday, December 7, 2007

How to : Play a real media file


Hi, to play a real media file you need this component. I have tested it on Ubuntu 7.10 before. This is the easy way I do it:

1. Install the Kaffeine player. To install just go to 'Synaptic Package Manager' and search for it. Then, 'Mark for Installation' to install the Kaffeine.

2. You need download the "essential codecs package" from MPlayer download page: http://www.mplayerhq.hu

3. Make directory name "win32" in the /usr/lib with your terminal. Please doing this section with root privilage. Its become /usr/lib/win32 .

4. Extract the "essential codecs package" that you have download before and copy all the contents to /usr/lib/win32 .

5. Open Kaffeine player. For the 1st time the kaffeine can't play the real media. This is because the codec is not define properly. What you can do is, just go to settings --> xine engine --> parameters --> decoder and type /usr/lib/win32 under the external Real Media codecs path. Now you can enjoy watching your real media file. Thats all.

Thursday, November 8, 2007

Tomboy: The easiest Note-taking Program (Ubuntu 7.10)


Relatively new application that has found its way into recent versions of almost all Linux distributions is Tomboy. It is in cross-indexing tool and a quick publisher all rolled into one. Tomboy is also very addictive and easy to use, and does away with the hassle of naming files and remembering the directory paths. It is an evolving application and the latest release is still at version 0.6.

To start:
1. Go to Application --> Accessories --> Tomboy Notes, which lunched Tomboy as an applet on your panel. Once lunched it remains active and you can access your note quickly from the applet icon till you log out or quit the applet.

2. To give automatic lunched Tomboy every time you boot the system; you can use this guide (for gnome):
right-clicking on an empty space on the panel and selecting the 'Add to Panel' option. Once you have 'Add to Panel' window up, select the Tomboy Notes application and click the 'Add' button to add it in your panel.

Many feature Tomboy can do. For more infomation about Tomboy please visit http://www.gnome.org/projects/tomboy/


Sunday, November 4, 2007

How to: Easy install Automatix2 on Ubuntu 7.10 (Gusty Gibbon)

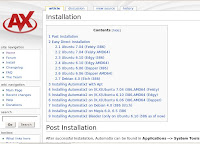
1. Go to this link http://www.getautomatix.com/wiki/index.php?title=Installation

2. Select your machine architecture. For this example, I choose 2.1 Ubuntu 7.10 (Gutsy i386) because my machine is i386 base architecture.

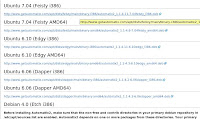
3. Click on
http://www.getautomatix.com/apt/dists/gutsy/main/binary-i386/automatix2_2.0.5-7.10gutsy_i386.deb
to download the software.

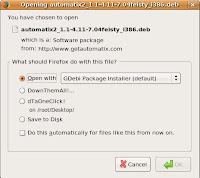
4. The package installer will pop up. Choose the default. Open with Gdebi Package Installer

5. Wait until finish. To open Automatix2, go to your desktop and click on Application --> System Tools --> Automatix

Thats all.

See also previous post:

Easy Install Automatix2 on Ubuntu 7.04 (Feisty Fawn)


Tuesday, August 28, 2007

The solution for Ubuntu 7.04 to work with projector

This is the solution for Ubuntu 7.04 to work with projector properly. Add 3 lines to the /etc/X11/xorg.conf file, and restart the X-Window.

Section "Device"
Identifier "Intel Corporation Mobile 945GM/GMS/940GML Express Inte
Driver "i810"
BusID "PCI:0:2:0"
Option "MonitorLayout" "CRT,LFP"
Option "Clone" "true"
Option "DevicePresence" "true"
EndSection


Finish...

Monday, August 27, 2007

How to: Setup file sharing using samba on Ubuntu 7.04 (Fiesty Fawn)

These are steps to setup file sharing using samba on Ubuntu 7.04:

To install samba
1. Open Synaptic package manager. System --> Administration --> Synaptic Package Manager.
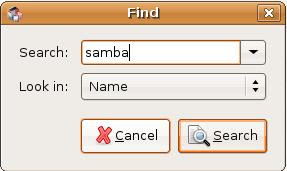
2. Click search button and search 'samba' like picture below

3. Right click on word samba and mark for installation.
4. Click button Apply in your synaptic.
5. They will install and wait until finish.

To configure:
1. Go to System --> Administration --> Shared Folders.
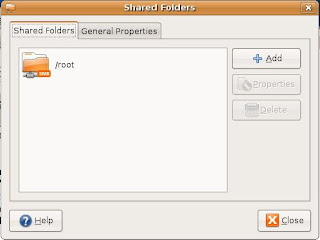
2. Click Add button to add the sharing folder like picture below.

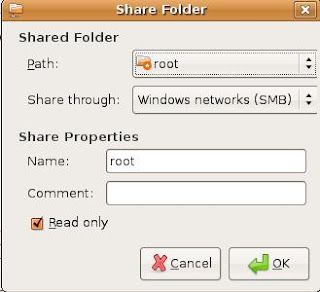
3. Under Shared Folder, enter what path you need to shared. For example root. You shared folder will be in /root. Leave a default on Share through.

4. Under Share Properties, enter a name for shared folder name and also enter the discription such as "marketing_file". Click ok to finish.

To access the shared file:
1. Open your file explorer and type the address. For example, smb://(ip. no or your server name)
or
2. In windows, open your "windows explorer". Type the same address above.

Thats all.

Wednesday, August 22, 2007

How to: Install Clamav and it's GUI (Ubuntu 7.04)

These are steps for install Clamav and it's GUI.

1. Open Synaptic Package Manager
2. Search "clamav" without "'
3. Click and install clamav, clamav-base, clamav-freshclam, clamav-getfiles, and clamtk (this is for clamav user interface).
4. Click Apply on your synaptic. The system will install all software including the dependencies automatically. Wait until finish. Close the Synaptic.

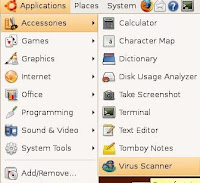
Go to you desktop Application --> Accessories --> Virus Scanner to open the clamav GUI.
Using clamav with command line:

freshclam for update the definition.
clamscan for scanning

for detail for each commands, type man (the command).

Thats all.

Tuesday, August 21, 2007

How to: Install and uninstall KDE on Ubuntu 7.04 (Feisty Fawn)

Hi, these are guides to install and how to uninstall the KDE (Kubuntu) on Ubuntu 7.04:

To install
1. Open your terminal.
2. Type sudo apt-get install kubuntu-desktop. The system will ask you if you want to use kdm or gdm. gdm is recommended.
3. To go with KDE environment; you must logout the desktop. To logout go to System -> Quit -> Log Out.
4. After reboot, choose Sessions: KDE

To uninstall
1. sudo apt-get remove kubuntu-desktop
2.
If you used aptitude to install other desktop environments, use this command:
sudo aptitude remove kubuntu-desktop

Thats all ^_^

Tuesday, August 14, 2007

How to: Install Internet Explorer (IE) on Ubuntu 7.04 in 10 minute


These are the steps:


1) First, you need to install software call Wine.

2) Open your terminal and login as root.

Type;
For gpg key:
wget -q http://wine.budgetdedicated.com/apt/387EE263.gpg -O- | sudo apt-key add -


Download and install:

wget http://wine.budgetdedicated.com/apt/sources.list.d/feisty.list -O /etc/apt/sources.list.d/winehq.list

Wait until its finish and install.

3) Download
cabexract. Open your browser and enter a url http://packages.ubuntu.com/cgi-bin/download.pl?arch=i386&file=pool%2Funiverse%2Fc%2Fcabextract%2Fcabextract_1.2-2_i386.deb&md5sum=b9f48e133c4d2a522178c03590b8ad29&arch=i386&type=main

Click the mirror do you like to download
cabexract and open with Gdebi Package Installer. Its will install automatically.

4) Download a IE4linux:
wget http://www.tatanka.com.br/ies4linux/downloads/ies4linux-latest.tar.gz

Untar it.
tar zxvf ies4linux-latest.tar.gz

Go to directory
cd ies4linux-*

Intall and run
./ies4linux

Its will ask you to install the IE. Follow the instruction!

5) After you install the IE is not run yet. You must type
/root/bin/ie5 for ie5 or /root/bin/ie6 for ie6.

6) Once you run the
/root/bin/ie5 the shortcut will automatically created on your desktop.

The end...

Friday, August 3, 2007

Another Ubuntu Flavor: Ubuntu Studio


Ubuntu Studio bills itself as the "multimedia creation flavor of Ubuntu," an official Ubuntu project "aimed at the GNU/Linux audio, video, and graphic enthusiast as well as professional." It is certainly flashy on the outside -- even if it is mostly the same Ubuntu Linux distro under the hood.

"
We provide a suite of the best open-source applications available for multimedia creation. Completely free to use, modify and redistribute. Your only limitation is your imagination."

For me, this Linux is nice for multimedia. Current release is UbuntuStudio 7.04. Congratulation to Ubuntu Team that make this distro (Ubuntu Flavor) alive!.

Some screen shots. Follow this link:
http://ubuntustudio.org/screenshots

To download:
http://ubuntustudio.org/downloads

Wiki:
https://wiki.ubuntu.com/UbuntuStudio

Support:
http://ubuntustudio.org/support


Sunday, July 29, 2007

Linux Networking No.6 : TCP/IP and Ports

The list of known services and their relative ports is generally found in /etc/services. The official and associated is managed by the IANA(Internet Assigned Numbers Authority).

We will look at the output of portscans. Beware that unauthorised portscanning is illegal although many use them.

Here is the output of a portscan:

Port state Services
21/tcp open ftp
22/tcp open ssh
23/tcp open telnet
25/tcp open smtp
70/tcp open gopher
79/tcp open finger
80/tcp open http

This shows open ports, these are ports being used by an application.

the /etc/services main ports (examples):
ftp-data 20/tcp
ftp 21/tcp
fsp 21/udp fspd
ssh 22/tcp # SSH Remote Login Protocol
ssh 22/udp
telnet 23/tcp
smtp 25/tcp mail
www 80/tcp http # WorldWideWeb HTTP
www 80/udp # HyperText Transfer Protocol
pop3 110/tcp pop-3 # POP version 3
pop3 110/udp pop-3
sunrpc 111/tcp portmapper # RPC 4.0 portmapper
sunrpc 111/udp portmapper
auth 113/tcp authentication tap ident
sftp 115/tcp
uucp-path 117/tcp
nntp 119/tcp readnews untp # USENET News Transfer Protocol
ntp 123/tcp
ntp 123/udp # Network Time Protocol
pwdgen 129/tcp # PWDGEN service
pwdgen 129/udp # PWDGEN service
loc-srv 135/tcp epmap # Location Service
loc-srv 135/udp epmap
netbios-ns 137/tcp # NETBIOS Name Service
netbios-ns 137/udp
netbios-dgm 138/tcp # NETBIOS Datagram Service
netbios-dgm 138/udp
netbios-ssn 139/tcp # NETBIOS session service
netbios-ssn 139/udp
imap2 143/tcp imap # Interim Mail Access P 2 and 4
imap2 143/udp imap
snmp 161/tcp # Simple Net Mgmt Protocol
snmp 161/udp # Simple Net Mgmt Protocol
snmp-trap 162/tcp snmptrap # Traps for SNMP

Monday, July 16, 2007

Easy Install Automatix2 on Ubuntu 7.04 (Feisty Fawn)

Automatix is collaborating with Technalign Inc. to bring a lot of new and exciting commercial software to Automatix users. Automatix2 now comes with Crossover Office Standard and Professional on Ubuntu 7.04 amd64 (which basically means you can run a ton of 32 bit windows software on Ubuntu 7.04 amd64).

These is the easy step to install Automatix2 on Ubuntu 7.04:

1. Go to this link http://www.getautomatix.com/wiki/index.php?title=Installation


2. Select your machine architecture. For this example, I choose 2.1 Ubuntu 7.04 (Feisty i386) because my machine is i386 base architecture.

3. Click on
http://www.getautomatix.com/apt/dists/feisty/main/binary-i386/automatix2_1.1-4.11-7.04feisty_i386.deb
to download the software. See picture.


4. The package installer will pop up like picture below. Choose the default. Open with Gdebi Package Installer


5. Wait until finish. To open Automatix2, go to your desktop and click on Application --> System Tools --> Automatix

Thats all. Easy!

Thursday, July 12, 2007

Linux Networking no.5: Round Robin DNS Load Balancing

How DNS load balancing works
When the request comes to the DNS server to resolve the domain name, it gives out one of the several canonical names in a rotated order. This redirects the request to one of the several servers in a server group. Once the BIND feature of DNS resolves the domain to one of the servers, subsequent requests from the same client are sent to the same server.

DNS load balancing implementation (Multiple CNAMES)

This approach works for BIND 4 name servers, where multiple CNAMES are not considered as a configuration error. Assuming there are 4 web servers in the cluster configured with IP addresses 192.168.1.[1-4], add all of them to the DNS with Address records (A Names) as below. The server[1-4] can be set to any name you want, such as foo[1-4], but should match the next step.

server1 IN A 192.168.1.1
server2 IN A 192.168.1.2
server3 IN A 192.168.1.3
server4 IN A 192.168.1.4

Add the following canonical names to resolve www.yourdomain.com to one of these servers.

www IN CNAME server1.yourdomain.com.
IN CNAME server2.domain.com.
IN CNAME server3.domain.com.
IN CNAME server4.domain.com.

The DNS server will resolve the www.yourdomain.com to one of the listed servers in a rotated manner. That will spread the requests over the group of servers.

Note: The requests sent to http://yourdomain.com (without 'www') should be forwarded to http://www.yourdomain.com in this case to work. For BIND 8 name servers, the above approach will throw an error for multiple CNAMES. This can be avoided by an explicit multiple CNAME configuration option as shown below.

options {
multiple-cnames yes;
};

DNS load balancing implementation (Multiple A Records)

This above approach with multiple CNAMES for one domain name is not a valid DNS server configuration for BIND 9 and above. In this case, multiple A records are used.

www.foodmalaysia.net. 60 IN A 192.168.1.1
www.foodmalaysia.net. 60 IN A 192.168.1.2
www.foodmalaysia.net. 60 IN A 192.168.1.3
www.foodmalaysia.net. 60 IN A 192.168.1.4

The TTL value (eg: 60) should be kept to a low value, so that the DNS cache is refreshed faster.

Other considerations

The DNS based load balancing method shown above does not take care of various potential issues such as unavailable servers (if one server goes down), or DNS caching by other name servers. The DNS server does not have any knowledge of the server availability and will continue to point to an unavailable server. It can only differentiate by IP address, but not by server port. The IP address can also be cached by other nameservers, hence requests may not be sent to the load balancing DNS server.

Considering the functionality, the round robin DNS is not a load balancing mechanism but a load distribution option. Some of these drawbacks can be overcome by implementing an advanced version of the DNS load balancer using Perl scripts.

Some other variety of load balancing can be performed by using a proxy server, where one of the web servers, is solely used for re-routing of traffic to the other servers. If Apache is used as a web server, the mod_rewrite feature of Apache can be used for this purpose as detailed in this Apache website article.

Friday, July 6, 2007

Linux Networking no.4: Common Network Tools

Here is a short list of tools helpful when trouble shouting network connections.

1. ping:

This tools sends and ICMP ECHO_REQUEST datagram to a host and expects an ICMP ECHO_RESPONSE.

Options for ping
-b ping a broadcast address
-c send N packets
-q quiet mode: Display only start and end messages

2. tcpdump:
This is a tool used to analyse network traffic by capturing network packets. The following commands illustrate some options:

Let tcpdump autodetect network interface
tcpdump

Specify a network interface to capture packets from
tcpdump -i wlan0 (wlan0 is your network interface card)

Give an expression to match
tcpdump host 192.168.10.1 and port 80

3. netstat
Get information on current network connections, the routing table or interface statistics depending on the options used.

Option for netstat:
-r same as /sbin/route
-l display list of interface
-n don't resolve IP address
-p returns the PID and names of programs (only for root)
-v verbose
-c continuous update

4. arp:

Display the kernel address resolution cache.

5. traceroute:

Displays the route taken from the local host to the distination host. Traceroute forces intermediate routers to send back error messages (ICMP TIME_EXCEEDED) by deliberately setting the ttl(time to live) value too low. After each TIME_EXCEEDED notification traceroute increment the ttl value, forcing the next packet to travel further, until it reaches its' destination.

Option for traceroute:

-f ttl change the initial time to live value to ttl instead of 1
-n do not resolve IP numbers
-v verbose
-w sec set the timeout on returned packet to sec

Thats all.

Linux Networking no.3: Stop and Start Networking

Stop and start networking in Linux is quite defference with windows. Some peoples like to start and stop their networking with this command:

1. To start on Ubuntu Linux (network script):
/etc/init.d/networking start
2. To stop
/etc/init.d/networking stop

On Debian similar commands are used as above.

but

Do you know other command?
The others command is:

To start :
ifup eth0 (eth0 is your network card name)

To stop:
ifdown eth0

That all.


Monday, July 2, 2007

Linux Networking no.2 : DNS Resolve with Dig

Using dig command on your terminal to resolve a domain.

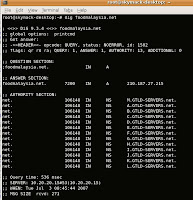
1. Open terminal and type dig foodmalaysia.net. See picture below for sample result.
2. To check your local webserver is responsible for this domain, use the following command:
dig @localhost foodmalaysia.net

3. Use also this command to check your mailserver responsibelity
dig MX foodmalaysia.net

4. To get all available command, run this command:
dig --help

5. A more detailed and description, type this command for linux manpage:
man dig
To quit in this manpage, press button Q on your keyboard.

Linux Networking no.1: IP Address classes
Internet protocol (IP) defines the structure of packet of data (datagrams) that are exchanged over the network.

IP address classes have a following range:

Class A: 0.0.0.0 to 127.255.255.255

Class B: 128.0.0.0 to 192.255.255.255

Class C: 192.0.0.0 to 223.255.255.255

Class D: 224.0.0.0 to 239.255.255.255

Class E: 240.0.0.0 to 247.255.255.255

Run ifconfig at your terminal to see you IP and refer back in this article for classes.

Friday, June 29, 2007

How to know your Ubuntu release version

How to know your Ubuntu Linux release version?
Its easy. Follow these steps:

1. Open your terminal
2. Login as root
3. Type cat /etc/issue.net

Its will display your version something like this:
Ubuntu 7.04

OR
go to your desktop, system->about ubuntu->version and release numbers

OR
lsb_release -a

It's will display like this:
No LSB modules are available.
Distributor ID: Ubuntu
Description: Ubuntu 7.04
Release: 7.04
Codename: feisty

Thats all.

Saturday, June 23, 2007

Dell Offer Open Source Software for their machine (Ubuntu Linux OS)

Be proud! Dell has announce Ubuntu Linux for his machine.
For advanced users and tech enthusiasts, Dell happy to offer a new open-source operating system, so you can dive in and truly enjoy a PC experience just the way you want it. In addition to the FreeDOS systems Dell already offer, they are proud to announce PCs with Ubuntu.

See this link to believe:
http://www.dell.com/content/topics/segtopic.aspx/linux_3x?c=us&cs=19&l=en&s=dhs

Wednesday, June 20, 2007

How to install Beryl on Ubuntu 7.04 (Feisty)

Hi there, do you know about Beryl. Beryl is an OpenGL accelerated desktop that seeks to provide a free, open source desktop experience to the community that reflects the wishes of the users. With Beryl, you can bring your desktop more effect such as make 3D Desktop, make browser interface elastic like rubber and so on. This is time for 'Wow' say Windows Vista(Yes, compete Win Vista). This is how to easy install Beryl on Ubuntu 7.04 (Feisty).

1. On your Desktop point your mouse to System --> Administration --> Synaptic Package Manager to open the Synaptic Package Manager.

2. On Synaptic Package Manager, click on Search button at the top. Type beryl to search.3. At column Package name, tick beryl. Its will install all package that required by beryl. For better effect for you Desktop, I recommend to install also Emerald-theme, beryl-ubuntu, and beryl-manager.4. Click Apply button to continue. The summary popup will display. Click Apply button to continue.

5. Close the Synaptic Package Manager after system finish download and install.

6. We need some extra configuration. Open your terminal and login as root. Type sudo cp /usr/share/applications/beryl-manager.desktop /usr/share/application/xdg/autostart/beryl-manager.desktop

7. After all complete, you machine need to be restart or log off. This is for all setting apply properly to your desktop.

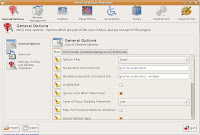
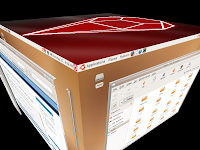
8. For further setting, go to you Desktop, click on Applications --> System Tools -->Beryl Settings Manager to open it. Here, you can set all setting about beryl effect.9. Apply your setting here and your Desktop will change to 'Wow!'. Thats all.This is my Beryl (desktop effect) on my machine:

Saturday, June 16, 2007

Install Debian with VirtualBox via 'netinst' image


Hi, I just install my HP DC7700 with the latest Debian GNU/Linux 4.0. These is how I done it:

1. First, i just download the netinst image from http://www.debian.org/CD/netinst/. The size is about 180mb(*.iso)

2. I open VirtualBox and mount the image. See How to install CentOs v5 on Ubuntu 7.04 using virtual box topic that I post before. Install Debian GNU/Linux 4.0 with instruction.

3. In some instructions, its will request the mirror to download all Debian package (Xwindows, Mysql, Php and everything). You can select the mirror in this part. For me, I just select the default.

4. After that, the software will install itself until finish. For slow connection like mine, its will take 3 to 4 hour to download and install.

5. Before finish, the software will prompt you to fill password and its done. Thats all.

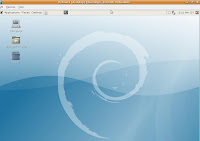
6. This is my Debian 4.0 on my VirtualBox machine. ^_^

Thursday, May 24, 2007

How to install CentOS v5 on Ubuntu 7.04 using VirtualBox

Hi,

How to install CentOS 5 on Ubuntu 7.04 using VirtualBox? These is the way:

1. Open your VirtualBox. Click on Applications --> System Tools --> InnoTek VirtualBox.
2. Click New button to create the new virtual disk like picture below.


3. On the New Virtual Disk Wizard, click next button.


4. On the Name, fill in your OS' name like mine Centos5.


5. On the Memory display, specify you memory for you virtual mechine (Centos5). In this way, i just follow the recommendation = 128MB and click Next.


6. Virtual Hard Disk will display right now. Click New.


7. On Vitual Image Type, 2 type of image type here. Choose Dinamically expanding image and click next.


8. On Virtual Disk Location and Size, its will show Image file name and image size automatically. You can specify the name and size if you want. See picture below.


9. Ok, right now your VirtualBox will display the summary like picture below. Click finish.


10. See picture below. Virtual Hard Disk have created. Click next.


11. This display will summary all about you did before like Name, Os Type and others. Click Finish.


12. Ok, you will back to your VirtualBox main display (see picture below). Its will show you Centos5 at left column and at the right all detail about your virtual OS. In this case, Centos5 will install through CD-ROM drive. Please insert the Centos5 CD on your CDROM and click on CD/DVDROM to mount it. Click button Start to begin the your virtual mechine.


13. After your click Start button, its will boot your Centos5 to start installation. See picture belows.


14. Ok, on this part you will install Centos as ordinary. To install Centos5 you can refer this link.
http://howtoforge.com/perfect_setup_centos5.0

That's all. ^_^

Wednesday, May 23, 2007

How to get Ubuntu Linux Software.


Latest Ubuntu software CD cover


Hi, Ubuntu Linux is the most friendly linux I ever have. So many packages and of course its easy to install. Base on my experiences as trainer assistant, Ubuntu linux is easy to catch up by newbie Linux user. Easy to call "Ubuntu has a sibling" such as Kubuntu, Edubuntu and Xubuntu. Kubuntu is Ubuntu that running on KDE base destop and Edubuntu is specially created for education purpose. So, what is Xubuntu? Xubuntu running on light weight desktop interface call Xface. It's created for old machine like Intel 486, Pentium MMX and etc.

2 way to get Ubuntu:
1. Download at http://www.ubuntu.com/getubuntu/download
2. Request to shipit the CD. Go to https://shipit.ubuntu.com/ . You must register and fill in you detail like address and email. It's will send the varification at your email.

To download Kubuntu, this is the link:
http://www.kubuntu.org/download.php

To download Edubuntu, this is the link:
http://www.edubuntu.org/Download

To download Xubuntu, this is the link:
http://www.xubuntu.org/get

That's all. ^_^

How to install Warzone 2100 game on Ubuntu 7.04

1. Firstly, you must download the game at http://wz2100.net/downloads.html
2. Go to word Ubuntu Package and click it to download. Picture shown below.


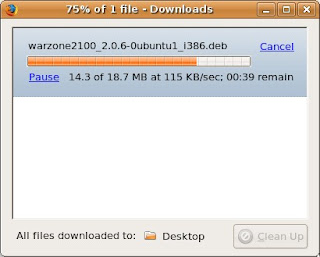
3. Firefox(some internet browser) downloading interface will display like picture below.

Wait until downloading finish.

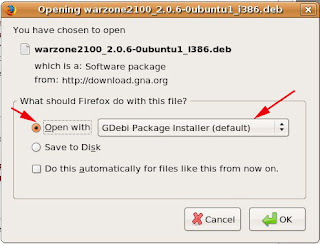
4. Open method will display. Choose Open with: GDebi Package Installer (default) like picture below.


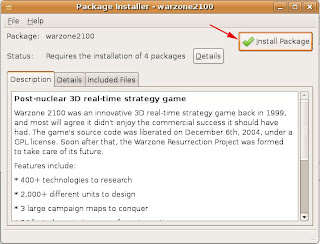
5. Package installer will display right now. Choose Install Package like picture below.


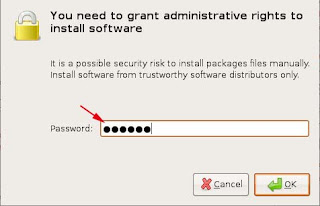
6. Fill in your password like picture below.


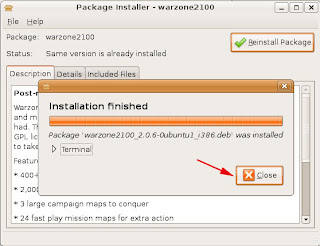
7. After finish installed, just click on close button like picture below.


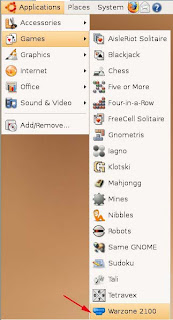
8. Go to you Ubuntu desktop. Go to Applications --> Games --> Warzone 2100 like picture below.


9. Warzone 2100 starting menu will be displayed like picture below.


That all. I wish you, Happy Gaming ^_^

How to easy install VirtualBox on Ubuntu 7.04

Innotek VirtualBox is a family of powerful x86 virtualization products for enterprise as well as home use. Many others open source virtual software outside like VMware, Xen and etc.

To install VirtualBox, follow this step:

1. You need automatix2 install. To install Automatic2 see my last post at http://yourubuntulinux.blogspot.com/2007/05/how-to-install-automatix2-on-ubuntu-704.html

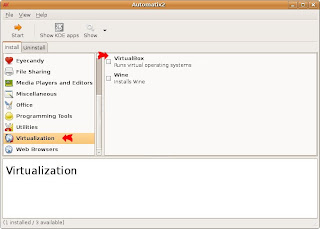
2. Open Automatix2 at your Ubuntu. To do just go to Applications --> Systems Tools --> Automatix. Press "yes". Picture below will be shown:

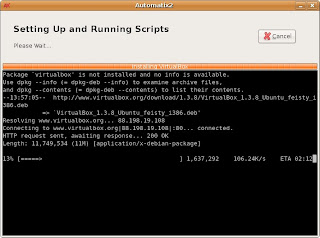
Choose Virtualization and tick at VirtualBox. Press Start to begin installation. The picture below will be shown. Wait until it's finish download and installed.


Finally, close your Automatix.

3. Where is VirtualBox in our Ubuntu? Go to Applications --> Systems Tools --> InnoTek VirtualBox.

It's done.

P/S: For "how to" install CentOS v5 on Ubuntu 7.04 using VirtualBox; I will post next time. ^_^

Saturday, May 12, 2007

How to install Automatix2 on Ubuntu 7.04

Hi,
Do you know about Automatix2?. Automatix2 is a free graphical package manager for the installation, uninstallation and configuration of the most commonly requested applications in Debian based Linux operating systems. Currently supported are Ubuntu 7.04, 6.10, 6.06, Debian Etch and Mepis 6. With Automatix2 you can install flash player for your firefox, gnome baker for CD/DVD burning and etc. So, it's easy!

To install Automatix2:

1. Go to Automatix2 wiki installation website at http://www.getautomatix.com/wiki/index.php?title=Installation

2. Click on 2.1 Ubuntu 7.04 (Feisty i386) for 32bit machine or 2.2 Ubuntu 7.04 (Feisty AMD64) for 64bit machine. For my example I choose and click at 2.1 Ubuntu 7.04 (Feisty i386).

3. After you click at 2.1 Ubuntu 7.04 (Feisty i386), it's directly go Ubuntu 7.04 (Feisty i386) and click the url http://www.getautomatix.com/apt/dists/feisty/main/binary-i386/automatix2_1.1-4.3-7.04feisty_i386.deb

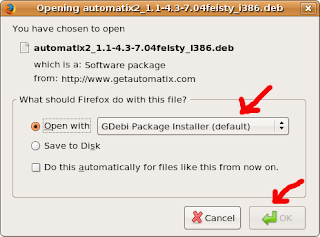
4. When you click, the popup installer will come up like the picture below. Choose open with Gdebi package installer (default) and click Ok.


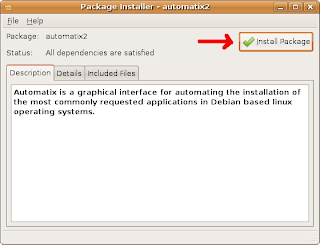
5. After that the package installer will come up like picture below. Click on Install Package. With until it's finish install.


6. When finish, just close the package installer.

7. Go to you Ubuntu desktop, click on Applications --> System Tools --> Automatix. This is your Automatix software location that you installed before.

8. For the first time you running it, its will run update. After that you will use this software and enjoy!

Linux game links

These is some links for Linux games:

http://www.linuxgames.com/
http://happypenguin.org/

Dell to Offer Ubuntu 7.04

In February when Dell launched IdeaStorm as forum for customers to contribute ideas for product offerings, we received overwhelming feedback that customers wanted Linux on desktops and notebooks.

As part of an overall effort to update our Linux program, today we are announcing a partnership with Canonical to offer Ubuntu on select consumer desktop and notebook products.

read more... click here

Monday, April 23, 2007

Ubuntu 7.04 running smooth on HP DC7700 machine

After all, Ubuntu 7.04 (Feisty Fawn) release the stable version on 19 April 2007. I´m happy it´s support and running properly on my HP DC7700 machine, no need extra command to install like 6.10 before. Just boot a CD 7.04 and install like previous Ubuntu version.

Nice interface and desktop feature on Ubuntu 7.04. The most i like is Desktop Effect. No need to install another software like Beryl or Compiz. It´s already install by default.

Congratulations to Ubuntu Team! :-)

Wednesday, April 18, 2007

Open Source Real Time Strategy Game

Hi,
I just found the open source game. Itś call WARZONE 2100. Base on 3D real time strategy. Itś can running on cross platform and the best thing is itś support Ubuntu 6.10 and 7.04. To download click at url below:

http://wz2100.net/downloads.html


Screenshot:

Sunday, April 15, 2007

13 things to do immediately after intalling ubuntu

Please click this link:

http://www.digg.com/linux_unix/13_Things_to_do_immediately_after_installing_Ubuntu

This is very good guide to touch-up our ubuntu.

Tuesday, April 3, 2007

Ubuntu on HP DC7700

Hi,

I have trouble to install Linux on HP DC7700 PC. I have try to install 3 distro linux(Suse, CentOS and Ubuntu). Finally, i found the best linux(Suse and Ubuntu 7.04 Beta) that suite in this pc. To install the Ubuntu 7.04 Beta you must enter some command to start installation process. The command is:

install noapic nolapic pci=noacpi acpi=off


Good luck.

Install KDE Desktop on Ubuntu

Dear All,

If you are using Ubuntu and would like to use KDE desktop environment instead
of the default Gnome, visit the address below for a step by step guide to
install KDE on Ubuntu.

http://yourubuntulinux.blogspot.com/2007/08/how-to-install-and-uninstall-kde-on.html

Microsoft font for open office (Ubuntu Linux tips)

Even if you use OpenOffice, you might still want all the Microsoft fonts so that documents created using Word or PowerPoint look as they were supposed to when you open them with OpenOffice. You can install the MS core fonts by installing the msttcorefonts package:

Note: You need "universe" in your sources.list

sudo apt-get install msttcorefonts

This will give you the core fonts, but if there are other TrueType fonts that you want installed, it is as easy as copying the font files to the ~/.fonts/ directory.

Automatix on Ubuntu Edgy Eft

Hello everyone,

I have install automatix in my ubuntu 6.10. It's very cool application. Any application can install easily and automatic such as plugin (Java,Flash, gbaker, etc). Please add "deb http://www.getautomatix.com/apt edgy main" (without "") in your source.list and download gpg key as follow below.
1. wget http://www.getautomatix.com/apt/key.gpg.asc
2. gpg --import key.gpg.asc
3. gpg --export --armor 521A9C7C | sudo apt-key add -

Caw!