How DNS load balancing works
When the request comes to the DNS server to resolve the domain name, it gives out one of the several canonical names in a rotated order. This redirects the request to one of the several servers in a server group. Once the BIND feature of DNS resolves the domain to one of the servers, subsequent requests from the same client are sent to the same server.
DNS load balancing implementation (Multiple CNAMES)
This approach works for BIND 4 name servers, where multiple CNAMES are not considered as a configuration error. Assuming there are 4 web servers in the cluster configured with IP addresses 192.168.1.[1-4], add all of them to the DNS with Address records (A Names) as below. The server[1-4] can be set to any name you want, such as foo[1-4], but should match the next step.
server1 IN A 192.168.1.1
server2 IN A 192.168.1.2
server3 IN A 192.168.1.3
server4 IN A 192.168.1.4
Add the following canonical names to resolve www.yourdomain.com to one of these servers.
www IN CNAME server1.yourdomain.com.
IN CNAME server2.domain.com.
IN CNAME server3.domain.com.
IN CNAME server4.domain.com.
The DNS server will resolve the www.yourdomain.com to one of the listed servers in a rotated manner. That will spread the requests over the group of servers.
Note: The requests sent to http://yourdomain.com (without 'www') should be forwarded to http://www.yourdomain.com in this case to work. For BIND 8 name servers, the above approach will throw an error for multiple CNAMES. This can be avoided by an explicit multiple CNAME configuration option as shown below.
options {
multiple-cnames yes;
};
DNS load balancing implementation (Multiple A Records)
This above approach with multiple CNAMES for one domain name is not a valid DNS server configuration for BIND 9 and above. In this case, multiple A records are used.
www.foodmalaysia.net. 60 IN A 192.168.1.1
www.foodmalaysia.net. 60 IN A 192.168.1.2
www.foodmalaysia.net. 60 IN A 192.168.1.3
www.foodmalaysia.net. 60 IN A 192.168.1.4
The TTL value (eg: 60) should be kept to a low value, so that the DNS cache is refreshed faster.
Other considerations
The DNS based load balancing method shown above does not take care of various potential issues such as unavailable servers (if one server goes down), or DNS caching by other name servers. The DNS server does not have any knowledge of the server availability and will continue to point to an unavailable server. It can only differentiate by IP address, but not by server port. The IP address can also be cached by other nameservers, hence requests may not be sent to the load balancing DNS server.
Considering the functionality, the round robin DNS is not a load balancing mechanism but a load distribution option. Some of these drawbacks can be overcome by implementing an advanced version of the DNS load balancer using Perl scripts.
Some other variety of load balancing can be performed by using a proxy server, where one of the web servers, is solely used for re-routing of traffic to the other servers. If Apache is used as a web server, the mod_rewrite feature of Apache can be used for this purpose as detailed in this Apache website article.
Showing posts with label Tips. Show all posts
Showing posts with label Tips. Show all posts
Thursday, July 12, 2007
Friday, July 6, 2007
Linux Networking no.4: Common Network Tools
Here is a short list of tools helpful when trouble shouting network connections.
1. ping:
This tools sends and ICMP ECHO_REQUEST datagram to a host and expects an ICMP ECHO_RESPONSE.
Options for ping
-b ping a broadcast address
-c send N packets
-q quiet mode: Display only start and end messages
2. tcpdump:
This is a tool used to analyse network traffic by capturing network packets. The following commands illustrate some options:
Let tcpdump autodetect network interface
tcpdump
Specify a network interface to capture packets from
tcpdump -i wlan0 (wlan0 is your network interface card)
Give an expression to match
tcpdump host 192.168.10.1 and port 80
3. netstat
Get information on current network connections, the routing table or interface statistics depending on the options used.
Option for netstat:
-r same as /sbin/route
-l display list of interface
-n don't resolve IP address
-p returns the PID and names of programs (only for root)
-v verbose
-c continuous update
4. arp:
Display the kernel address resolution cache.
5. traceroute:
Displays the route taken from the local host to the distination host. Traceroute forces intermediate routers to send back error messages (ICMP TIME_EXCEEDED) by deliberately setting the ttl(time to live) value too low. After each TIME_EXCEEDED notification traceroute increment the ttl value, forcing the next packet to travel further, until it reaches its' destination.
Option for traceroute:
-f ttl change the initial time to live value to ttl instead of 1
-n do not resolve IP numbers
-v verbose
-w sec set the timeout on returned packet to sec
Thats all.
Linux Networking no.3: Stop and Start Networking
Stop and start networking in Linux is quite defference with windows. Some peoples like to start and stop their networking with this command:
1. To start on Ubuntu Linux (network script):
/etc/init.d/networking start
2. To stop
/etc/init.d/networking stop
On Debian similar commands are used as above.
but
Do you know other command?
The others command is:
To start :
ifup eth0 (eth0 is your network card name)
To stop:
ifdown eth0
That all.
1. To start on Ubuntu Linux (network script):
/etc/init.d/networking start
2. To stop
/etc/init.d/networking stop
On Debian similar commands are used as above.
but
Do you know other command?
The others command is:
To start :
ifup eth0 (eth0 is your network card name)
To stop:
ifdown eth0
That all.
Monday, July 2, 2007
Linux Networking no.2 : DNS Resolve with Dig
Using dig command on your terminal to resolve a domain.
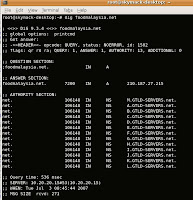
1. Open terminal and type dig foodmalaysia.net. See picture below for sample result.
 2. To check your local webserver is responsible for this domain, use the following command:
dig @localhost foodmalaysia.net
3. Use also this command to check your mailserver responsibelity
dig MX foodmalaysia.net
4. To get all available command, run this command:
dig --help
5. A more detailed and description, type this command for linux manpage:
man dig
To quit in this manpage, press button Q on your keyboard.
Linux Networking no.1: IP Address classes
Internet protocol (IP) defines the structure of packet of data (datagrams) that are exchanged over the network.
IP address classes have a following range:
Class A: 0.0.0.0 to 127.255.255.255
Class B: 128.0.0.0 to 192.255.255.255
Class C: 192.0.0.0 to 223.255.255.255
Class D: 224.0.0.0 to 239.255.255.255
Class E: 240.0.0.0 to 247.255.255.255
Run ifconfig at your terminal to see you IP and refer back in this article for classes.
Friday, June 29, 2007
How to know your Ubuntu release version
How to know your Ubuntu Linux release version?
Its easy. Follow these steps:
1. Open your terminal
2. Login as root
3. Type cat /etc/issue.net
Its will display your version something like this:
Ubuntu 7.04
OR
go to your desktop, system->about ubuntu->version and release numbers
OR
lsb_release -a
It's will display like this:
No LSB modules are available.
Distributor ID: Ubuntu
Description: Ubuntu 7.04
Release: 7.04
Codename: feisty
Thats all.
Sunday, April 15, 2007
13 things to do immediately after intalling ubuntu
Please click this link:
http://www.digg.com/linux_unix/13_Things_to_do_immediately_after_installing_Ubuntu
This is very good guide to touch-up our ubuntu.
http://www.digg.com/linux_unix/13_Things_to_do_immediately_after_installing_Ubuntu
This is very good guide to touch-up our ubuntu.
Tuesday, April 3, 2007
Ubuntu on HP DC7700
Hi,
I have trouble to install Linux on HP DC7700 PC. I have try to install 3 distro linux(Suse, CentOS and Ubuntu). Finally, i found the best linux(Suse and Ubuntu 7.04 Beta) that suite in this pc. To install the Ubuntu 7.04 Beta you must enter some command to start installation process. The command is:
install noapic nolapic pci=noacpi acpi=off
Good luck.
Install KDE Desktop on Ubuntu
Dear All,
If you are using Ubuntu and would like to use KDE desktop environment instead
of the default Gnome, visit the address below for a step by step guide to
install KDE on Ubuntu.
http://yourubuntulinux.blogspot.com/2007/08/how-to-install-and-uninstall-kde-on.html
If you are using Ubuntu and would like to use KDE desktop environment instead
of the default Gnome, visit the address below for a step by step guide to
install KDE on Ubuntu.
http://yourubuntulinux.blogspot.com/2007/08/how-to-install-and-uninstall-kde-on.html
Microsoft font for open office (Ubuntu Linux tips)
Even if you use OpenOffice, you might still want all the Microsoft fonts so that documents created using Word or PowerPoint look as they were supposed to when you open them with OpenOffice. You can install the MS core fonts by installing the msttcorefonts package:
Note: You need "universe" in your sources.list
sudo apt-get install msttcorefonts
This will give you the core fonts, but if there are other TrueType fonts that you want installed, it is as easy as copying the font files to the ~/.fonts/ directory.
Note: You need "universe" in your sources.list
sudo apt-get install msttcorefonts
This will give you the core fonts, but if there are other TrueType fonts that you want installed, it is as easy as copying the font files to the ~/.fonts/ directory.
Subscribe to:
Posts (Atom)